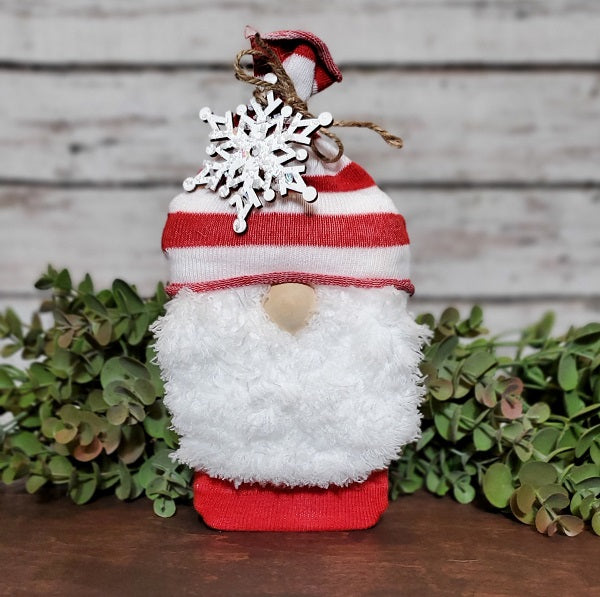
DIY Gnomes

Our DIY gnomes are no sew, affordable and super simple to make. Each gnome uses one sock and half a mop head for the beard. If you pick up an extra wood shelf sitter, you will be able to make two gnomes for $4 in Dollar Tree supplies plus a little ribbon and wood nose for embellishing. Gnomes are cute additions to tiered trays, mantels and holiday tables!

Supplies
- Wood shelf sitter
- Dusting/mop head
- Pair of long socks
- Split or full bead nose (we used a 25mm split bead)
- Various embellishments like a bow, pom pom, wood snowflake etc...)
- Glue gun
While we are making a Christmas gnome in our tutorial, you could easily use the same supplies to make gnomes for all major holidays. Using the white mop heads and shelf sitters from Dollar Tree keeps the project affordable but you could easily switch out a few of the supplies to make an upgraded version. The mop beard can be replaced with synthetic fur pieces found on Amazon or at Joann’s. The socks could also be replaced with old sweaters or material you already have at home. Dollar Tree normally has seasonal socks which is why we find them to be a cost-effective option to create gnomes for St. Patrick’s Day, Valentine’s Day and so on.

To start, remove any embellishments on your shelf sitters. Not all of the shelf sitters at Dollar Tree have adornments so you may get lucky and not have to do this step. Unless your shelf sitter shows through the socks, you do not need to paint your wood block.

Next, we cut our socks. Using the photo above as a guide you will be making three cuts. Our first cut removed the picture from our sock, the second and third cut removed the heel. We placed the foot portion of our sock over our block and the remaining top section will be used to create our gnome’s hat.

Next, we cut the beard. Cut your mop head in half. Position one half of the beard on your shelf sitter and crop accordingly. Important note- there are sewn seams in the mop head. When positioning the beard, keep the sewn seam side at the bottom and the cut line you just created as the top of your beard. If you decide to shorten your beard (we did cut off another two inches of our beard) cut the mop head along the same initial cutline. This way, the bottom of your beard will always remain with a seam giving it extra durability. When trimming the sides of your beard, make sure all cut lines stay to the outside of the now vertical seam. If you cut the vertical seams, you will lose chunks of beard.

With your beard created, you are ready to begin tacking pieces down. The socks are forgiving and should not unravel so you can play with positioning a bit to get the perfect look for your gnome before gluing pieces down permanently. Place the foot of your sock over the wood shelf sitter. The toe of the sock is the bottom of your gnome. Next, add your beard and tack down. Last, slide the hat (the tube portion of the sock you cut) over the beard and glue down in the back only.
Now you are ready for the cutest part of the gnome, the nose! Place your nose directly below the front hat brim. You can play with your nose a little. Some people like a flat line and others prefer a more dramatic rise of the hat over the nose. Once you have the nose in the perfect position, hot glue down.

For finishing touches we tied off the hat with a little jute twine. We also added a snowflake with a little fake snow we had left over from Dollar Tree. We think it gave the perfect amount of sparkle to an already adorable gnome.

We love how our Santa gnome turned out! We even made a variation with some buffalo check fabric and the left-over piece of Frankenstein’s hair we had laying around from our Halloween Wooden Spoons project.

So what do you think, is a gnome in your future? You can follow us on all social media @rettandco and use the hashtag #rettandco to share your finished works with us. We’d love to see them! ~ Rett & Co.
