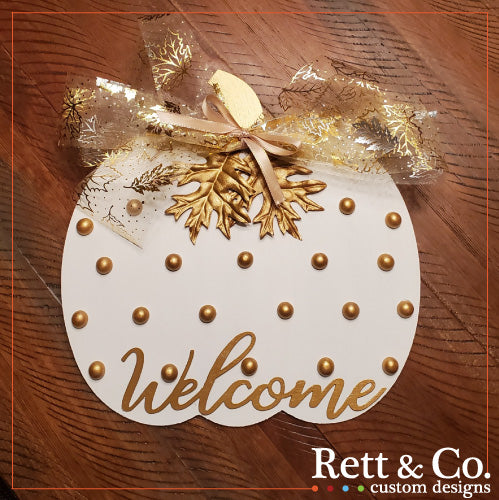
Gilded Pumpkin


I've always been enchanted with gilded pumpkins. When I saw the gold accent ribbon at Dollar Tree I knew it would be the perfect accent to a fall favorite!
Supplies
- One pumpkin wood cutout
- Gilded ribbon
- Leaves
- Metal word
- Foam brushes
- Tape
- Gold paint (we used Deco Art Dazzling Metallics in Glorious Gold)
- White paint (we used Delta Ceramcoat in White)
- Split Wooden Beads (we used 15mm split beads)
The first 5 supplies all came from Dollar Tree. They have a great craft section and are the perfect place to buy all of your base craft supplies and seasonal wood cutouts. We grab our paint from Joann Fabrics and Crafts when it is on sale. Our 15 mm split beads came from Amazon.

Start by removing both the hanger and the metal leaf hardware from the front of the wood pumpkin cutout. We will not be using the metal leaf today. We will, however, be reusing the hanger. See pics below for easy removal. Anytime a hanger has a hard end we save it instead of cutting it off.

With that step out of the way we can begin painting! Using a foam paint brush, apply a coat of white paint to the back of the wood pumpkin cutout. While this layer of paint dries, apply a coat of gold paint to the metal word and each side of two leaves. The Dollar Tree metal words come with three sayings. We chose the word welcome but harvest or blessings would have looked just as good. Both the wood cutout and the leaves will need two total coats of paint. The metal word will need at least 3.

The last items to paint are the split wood beads. I spaced my beads on my pumpkin first so I knew exactly how many to paint. As I removed each bead for painting, I placed a small dot where each one was so when I glued them back down they would be aligned. Normally, a little paint in a bowl will coat round wood beads nicely. However, because these beads are flat on one side, they will not coat well using this method. As an alternative, wrap tape (sticky side out) around each finger tip. Now, pick up each split bead by tapping the flat bottom with a taped fingertip. I load 4 beads at a time and by the time I paint the last one, the first one is usually dry. Alternate your way through your beads making sure each one receives one solid coat of gold paint.

Now you are ready for assembly! With a hot glue gun, permanently place your gold split beads. Next, glue on your scrap bow, gold leaves and gilded word. Scrap bows are super easy to make and my go-to for any ribbon embellishment. Always lay your tie ribbon down first. Then make a plus sign with your scrap ribbon. Tie a tight bow in the middle and adjust your ribbon to your liking.

Place the hanger we saved earlier back into the holes at the top of the wood cutout and you're ready to hang your gilded pumpkin!

We love how quickly this came together. I had friends over for coffee the other day and they couldn't believe I made this by hand with mainly Dollar Tree supplies. Thrifty can definitely be elegant! ~ Rett & Co.
