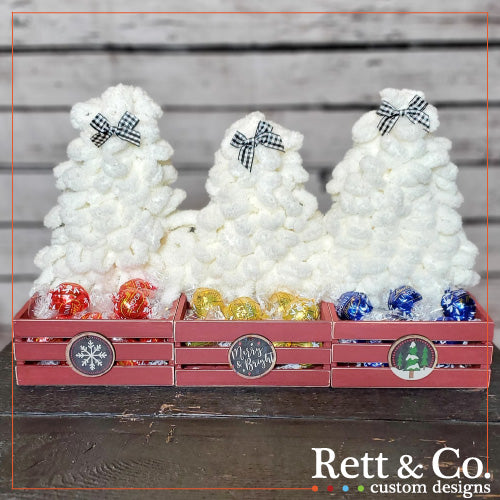
Holiday Treat Holder

Our holiday treat holder combines chic loop trees with chalk painted Dollar Tree crates creating a classy treat holder for the holidays!
We have a large extended family and when we celebrate the holidays at our house we spoil the kids rotten! In addition to the homemade goods, we always have Lindor Truffles or various Hershey's Kisses in a dish for a quick sweet treat. I have always been a bit of a germaphobe so the idea of having a cute candy holder with segregated sections is a dream come true. I love my nieces and nephews like they are my own but I don't like boogies in my candy assortment because someone is searching for the last peppermint kiss in a sea of regular kisses. We all have a "you touch it, you take it" rule in our homes and now we can apply it to the candy dish - my kids included!
To start, you may want to watch our quick tutorial on Loop Yarn Trees.
Supplies
- Loop yarn in any color (we used Bernat Alize in cream for this project)
- Three Triangles (we used three triangles from this garland at Joanns).
- Chalk Paint/ Wax (We used Folk Art Chalk Paint in Tuscan Red.)
- 3 wood crates from Dollar Tree
- Glue gun
- Adornments for trees and crates. (buffalo check bow, pom pom, wood snowflake etc...)
- Candy!

Begin by painting your crates. We used one coat of chalk paint both inside and out. After the paint dries, apply a thin coat of clear wax. After the wax has time to cure, hot glue your triangles onto the back of your crates.

Our triangles fit perfectly if we overlapped the tabs. While we believe the center tree would have been secure hot gluing just the ends, we did decide to drop the middle tree down and place a flat popsicle stick between the bottom of the tree and the crate for solid support. We will have a lot of kids digging in our crates so the sturdier the better!

Once the hot glue has cooled, you can begin wrapping your trees. On the back of the first triangle, hot glue the start of the loop yarn. Start wrapping the yarn around the triangle working your way to the top. Once you get to the top, cut the yarn and hot glue the remaining yarn to the top of the triangle. Normally, when you make a loop yarn tree, you hot glue each layer of yarn down so it does not shift. Our wood triangles had distinct edges holding the yarn in place so we felt it was unnecessary to glue each layer down. Additionally, by gluing just the bottom start and top end, we will easily be able to remove the yarn if it becomes dirty or we want to switch colors.

Continue to wrap the next two trees in the same fashion. Once the glue is cool, you are ready to adorn! If you are wrapping ribbon around your entire crate setup, you don't need to worry about what the back looks like. If the back of your treat holder will be exposed, you may want to tidy it up a bit. We chose to run another layer of loop yarn along the bottom of the two highest trees. We then hot glued a piece of twine colored ribbon to the middle tree's exposed bottom. Visually, the treat holder will look good in all directions now.

We placed mini buffalo check ribbons on top of all of our trees and feel they really set off the tree tips. On the front of our crates, we placed a few mini holiday ornaments we bought at Walmart. You could really go all out and add large bows or garland to the crates, too.

Last but not least, add your candy selection. We are going to start out with Lindoor Truffles but will be sure to pick up some peppermint kisses before the kids get here!

We hope you enjoyed this project as much as we did. Please share with a friend who loves a good DIY! ~ Rett & Co.
