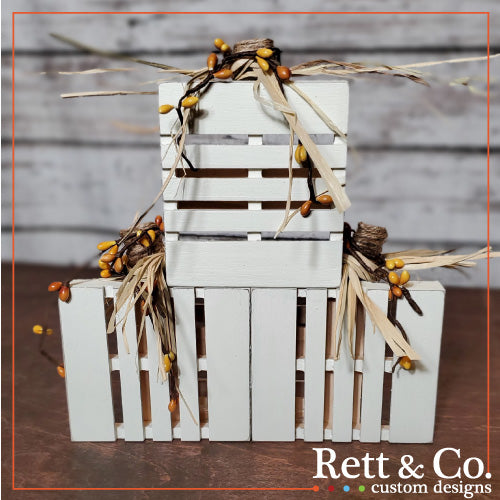
Pallet Pumpkins

Every time I am in Dollar Tree (which is quite a bit) I look for the small pallets everyone talks about. After a while, I just assumed my local Dollar Tree didn't carry them. I did find a good deal here so at least I had a back up plan. I took my lucky shopping friend with me Friday and low and behold they had stacks and stacks of the mini craft pallets! I didn't take them all but I did stock up.
I really wanted to make some double sided mini pumpkins with the pallets but decided to change it up a bit this year and make a tiered pumpkin. By using the tiered version, I still get the look of three pumpkins but I do save two pallets that I can use for upcoming crafts.
If you haven't been into Joann's lately, they currently have 70% off their fall decor. I picked up the wired beads shown below for less than a dollar. I think I used about $.15 cents worth on this project. There is also a white and red version that will look great with Christmas projects!
We have a dark wood player piano I am going to display my pallet pumpkins on, so I decided to go with a light chalk paint called Sheepskin. Keep in mind, this project would be cute in any color. I'm thinking about doing one in Cascade with Sheepskin as the undercoat to compliment.

Supply List
- 4 small pallets
- undercoat paint color of choice
- top coat paint color of choice
- 3 stems for pumpkin tops
- jute twine
- raffia
- embellishments
- hot glue gun
To start, we painted the edges on the front of 3 pallets Java. We did two quick coats because we only want the Java to show, not the actual pallet wood, after we sand. After the Java dried, we applied two coats of Sheepskin to all 4 pallets.

While the paint is drying, create your pumpkin stems. You can use real wood, mini wood craft sticks, cinnamon sticks, or even painted popsicle sticks. We rolled up a piece of cardboard from a fabric quarter and then wrapped it with jute twine to create a rustic looking pumpkin stem.
Once the mini pallets are dry, sand the edges so your undercoat paint color begins to pop through. We sanded all four edges of the front of our pumpkins. When finished, we applied a coat of clear wax for durability. Flip your pumpkins over and hot glue the "T" section where the pumpkins touch. We did the bottom two first and then applied the top pumpkin to the bottom two. While your pumpkins are flipped over and drying, glue the support pallet onto the back. This back pallet turns your design into a stable shelf sitter that will not fall over.

With the pallet pumpkin still flipped over, we hot glued our stems on. This way we could press and hold each stem while it firmly adhered to the pumpkin with out fear of separating a pallets. With the stems firmly in place, set your pumpkin upright and begin embellishing.

We wrapped each stem with raffia and then wove wired beading over the top of each stem and around the edges of our pumpkin. Leaves, acorns or mini fall flowers would all be great additions!

We love how our pallet pumpkin turned out! It was super simple, budget friendly and can be displayed the entire fall season. We also think it would be super classy as a table topper for a fall wedding.

We'd love to see/hear how you decorated your pallet pumpkin! Follow us on social media and tag any pictures of your creations with #rettandco so we can be sure to see them. ~Rett & Co
