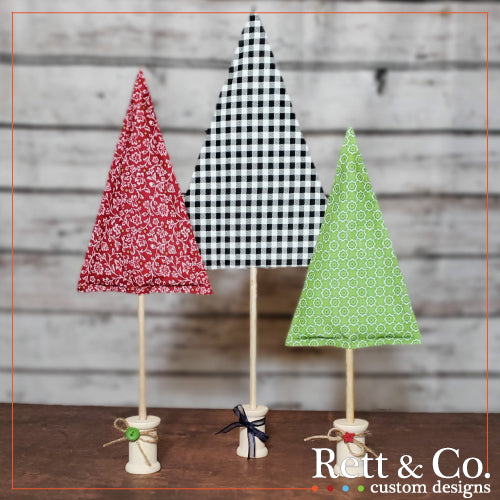
No Sew Holiday Tree

The cooler weather in our area is finally drawing out my holiday craft spirit! Lately, I have seen some adorable holiday trees online but they don’t quite match my décor. One of my favorite things about designing and crafting is the liberty to tailor a project to taste. Our no sew holiday trees provide ample opportunity to add your personal touch and will look great as a stand-alone centerpiece or with a group of already established items. We are still trying to figure out if we should set ours on our mantel, hearth, table display or new tiered tray!

Supply List
- Spools (we got our 6 pack from Joann’s)
- Dowels (we got a 5/16 dowel from Joann’s and it fits the spools perfectly)
- Batting or glittered drape from Dollar Tree
- Fabric (fabric quarters work great if you don’t have a stash)
- Aleene’s Tacky Glue
- Foam or paint brush
- Adornments if desired
- Cardstock or paper to create pattern
To start, create a triangle pattern out of cardstock or paper. You may want tall trees, skinny trees or wide trees etc… After your pattern is created, place each one on a dowel and cut the dowel to height. Our tallest dowel is 18 inches and our tallest triangle is 11 inches. We do not have any issue with the trees being top heavy but can’t guarantee that with anything taller. If you do want a taller tree and are worried about it being top heavy, stack two spools on top of each other for extra support.

With your pattern sizes prepared, you are ready to cut the fabric. Scissors or a rotary cutter will both work for this project. Fold your fabric over so that one cut will create two triangle pieces. After your fabric is cut, if you are using the glittered drape from Dollar Tree, you will need to cut a triangle piece for the inner filling half an inch smaller on all sides. We unfolded our drape so that each triangle of filling is 4 layers of drape. This sounds like a lot but the drape is very thin.
After you have all triangles cut, you will begin sandwiching your layers. You will have one fabric layer in back (pattern side down), 2 layers of the drape, your dowel centered approximately 2 inches from the top of the tree, the next two layers of drape and then your fabric top (pattern side up). Now that you have your triangle set, remove the top fabric and drape layers. Pick up the dowel and spread a line of glue from top to bottom on the drape. Roll the dowel in the glue and then cover with the top piece of drape.

With your dowel set, brush tacky glue along the inside edge of both the bottom layer of fabric and the top layer. We spread glue approximately 1/3rd inch wide around the entire perimeter of each triangle piece. Once your glue is spread, align the top piece of fabric to your sandwich and firmly press all of the edges down. You will have a small hole at the bottom where the dowel comes out, however, this is not an issue because we tacked down the dowel.

Depending on how thick your glue is, it will take 1-4 hours to dry completely. Watch your pieces for a few minutes after you glue them down. If anything begins to lift, you can firmly press the fabric back down to re-adhere it. While the glue is drying, you can adorn your spools. We quickly added some ribbon and buttons to ours. When we have more time, we may wrap the middle of each spool in vintage looking sheet music and add a few bells or holly.
Once the glue is completely set, you can trim the edges with scissors to remove any overlap or strings. As we mentioned previously, the 5/16th dowel fits perfectly in each spool. If you have wiggling for any reason or do not need to take apart your trees for storage, you could definitely add a bit of glue to each spool hole before sliding the dowel in for a firm hold.

We hope you love this craft as much we do! Be sure to follow us on Facebook, Instagram, Pinterest and YouTube @rettandco. Share your version of the craft using the tag #rettandco – we’d love to see your pics! ~ Rett & Co.
